
Custom printed flooring suitable for outdoor sports courts, especially the popular pickleball court matting, provides Dongxing Plastic with the most customized design solutions. We offer the following installation and maintenance steps to ensure proper installation and long-term use after receiving the product.
Applicable Installation Process:
Apply adhesive to weld joints + weld installation
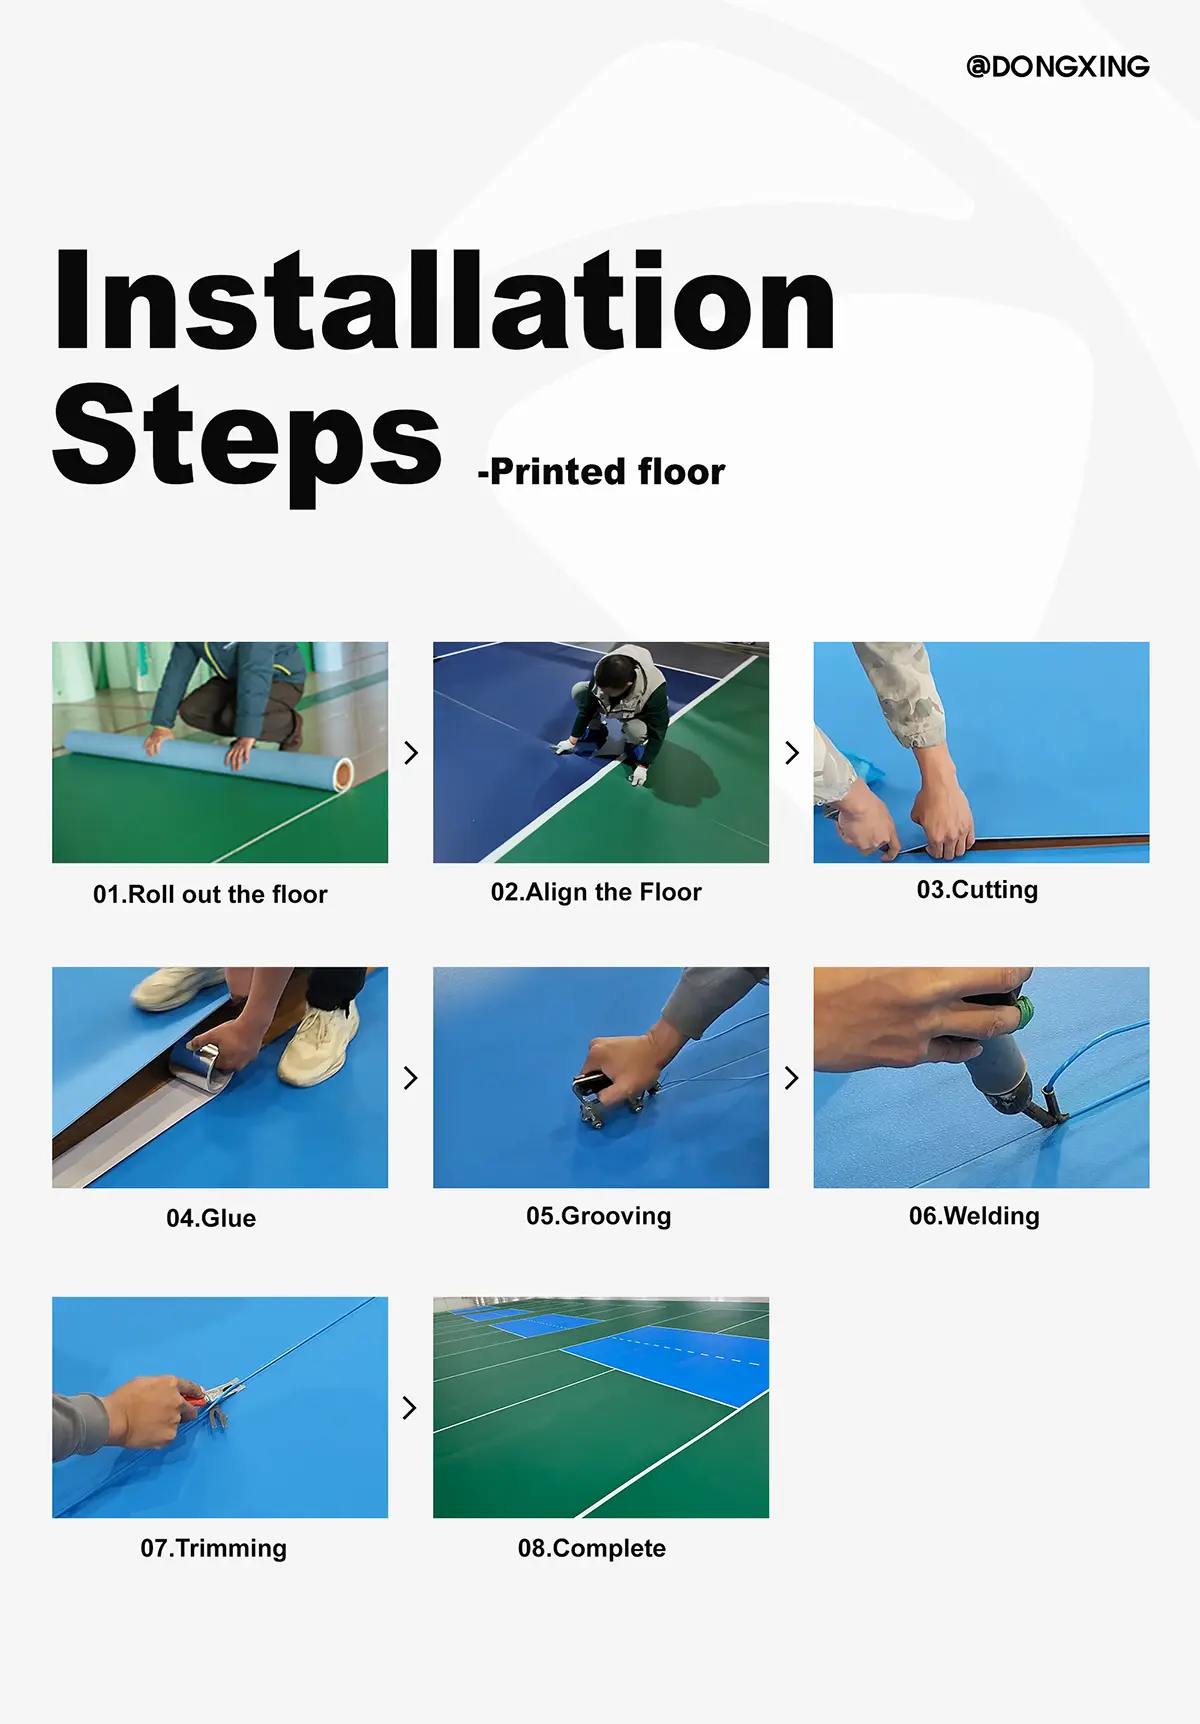
1. Preparation Before Installation
1.1 Requirements for the Substrate:
The substrate for outdoor custom flooring installation must be flat, dry, firm, free of dirt, protruding particles, and uneven.
1.2 Substrate and Environmental Testing
(1) The height difference of the expansion joints in the substrate should be within 2 mm. If it exceeds this range, leveling and grouting treatment are required.
(2) The strength of the substrate should not be lower than the concrete strength C-20. Otherwise, it is recommended to use a suitable self-leveling compound to enhance the strength.
(3) Use a hardness tester to test the hardness of the substrate. The surface hardness of the substrate should not be less than 1.2 MPa;
(4) The unevenness of the substrate should be less than 5 mm within a 2-meter straightedge range; otherwise, self-leveling compound is recommended for leveling;
(5) Use a thermometer and hygrometer to test the temperature and humidity. The ideal temperature for installation is 15-20℃. Installation is not recommended below 10℃, and cannot be done below 5℃. The relative humidity should be between 20% and 75%;
(6) Use a moisture meter to test the moisture content of the substrate. The moisture content of the substrate should be less than 3%.
1.3 Verify the roll material
Check whether the quantity received matches the quantity shipped
1.4 Install the flooring
It is recommended to arrange the storage area reasonably before installation, requiring the roll material to be placed vertically, and ensuring that the storage area is dust-free, sand-free, and protected from rain.
2. Measurement and Pre-laying
2.1 Verify the site dimensions against the installation design plan to ensure accuracy, and mark the flooring layout using engineering lines.
2.2 Pre-lay the flooring according to the rendering, placing the boards in their designated positions in an orderly fashion according to their numbers. After ensuring the pattern is neatly aligned, trim off any excess flooring.
3. Installation Method
3.1 Partial Fixing (Glue Application at Seams) Installation
Fold over approximately one-third of the width of two adjacent boards. Using the gap between the boards as the center line, evenly apply the special adhesive to the floor. After application, allow it to dry until it becomes tacky (apply the adhesive during the midday temperature. Welding must be done during the hottest part of the day!). Place the boards back in their original positions, ensuring the seams are aligned, and repeatedly press until firmly bonded.
3.2 Install the remaining boards in the same manner. Welding can begin one hour after installation.
4. Grooving and Welding
4.1 Grooving
Adjust the grooving tool to the appropriate depth and cut a U-shaped groove along the board seam at a uniform speed.
4.2 Welding
(1) Use a welding torch to smoothly and uniformly press the welding rod into the prepared U-shaped groove.
(2) After the weld wire cools, use a weld wire trimmer to remove the excess.
(3) Finally, check whether each weld is firm.
5. Cleaning and Maintenance of Outdoor Vinyl Sports Flooring Sites
5.1 Daily Cleaning
For minor contamination such as dust and debris, use a high-pressure spray gun and water to rinse.
5.2 Treatment of Special Dirt
For heavier contamination, use a floor scrubber and a floor cleaner at low speed.
(1) Oil stains: For localized oil stains, apply undiluted degreaser directly to a towel and wipe. For large areas of oil stains, dilute the degreaser with water and clean with a multi-functional floor scrubber at low speed.
(2) Adhesive or chewing gum: Apply a professional strong adhesive remover directly to a towel and wipe away.
5.3 Daily maintenance
(1) Ensure proper drainage to prevent excessive water accumulation that could cause site shifting.
(2) Avoid prolonged immersion of any part of the site in water, as this can affect the overall appearance of the site.
(3) After snowfall, promptly clear accumulated snow to prevent prolonged snow and ice buildup that could cause the boards to crack from freezing. 4. Cleaning and Maintenance Precautions:
(1) Do not use hard or rough cleaning tools (such as steel wool, knives, etc.) to clean the floor;
(2) Take care during use to avoid heavy objects being piled on, dragging, or strong impacts on the floor;
(3) Do not place heavy objects on the floor to avoid problems such as bulging and displacement due to the thermal expansion and contraction of the floor;
(4) For areas with high traffic and significant wear and tear, the floor maintenance cycle should be shortened.