
PVC flooring is an excellent choice for building indoor and outdoor sports courts. Its lifespan is often affected by the installation process. Following proper installation procedures can prevent problems such as cracking, bulging, deformation, and edge warping. Therefore, as a sports flooring material manufacturer, while we don’t directly provide installation services, we do provide installation tutorials. This guide is specifically designed for professional PVC sports flooring installation.
1. Why is proper installation important?
We have received many complaints from users of our products regarding quality issues caused by installation problems after receiving the goods. They have reported bulging, cracking, and edge warping in their PVC flooring, which is not necessarily a product defect. Although this situation is not common, according to our statistics, it is a significant phenomenon. Therefore, we provide detailed installation instructions after shipping and after the user receives the goods to ensure that usage problems are not caused by incorrect installation.
1.1 Avoiding High After-Sales Costs
Incorrect installation leading to the closure of your court for repairs will inevitably result in lost revenue and customers.
Low-cost installation teams have limited response times, and you will still have to bear the repair costs yourself.
Unlike outdoor interlocking sports tiles, PVC flooring doesn’t suffer from the high cost of complete replacement due to serious problems.
1.2 Reducing Problem Occurrence
Incorrect installation can easily lead to issues like weld cracking, bulging, and edge warping in the PVC flooring mat within a short period. Repairing these issues without replacing the flooring material is not simple, and even if repaired, traces of repair may remain, affecting usability.
1.3 Ensuring Player Safety
In most parts of the world, safety requirements for sports venues are extremely stringent. Injuries caused by improper installation often result in hefty punitive damages. Proper installation is the only way to avoid such risks.
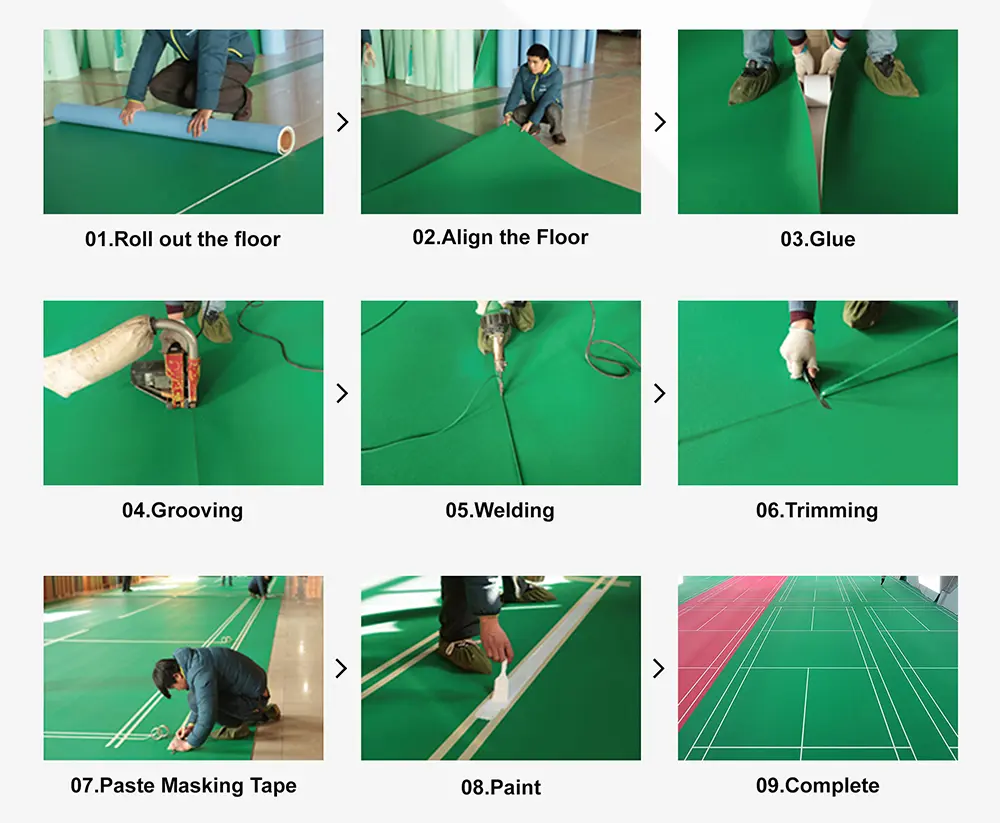
2. PVC Flooring Installation Steps
To help you quickly understand the installation process, please refer to the installation flowchart below:
2.1 Installation Methods
PVC flooring for sports courts offers two installation methods, depending on your venue’s needs:
- Full Adhesive Fixing Installation
- Semi-Fixed Installation (Tape + Welding)
Both methods require welding (except for convenient installations). The difference lies in whether the entire bottom of the PVC flooring is glued for fixation.
2.2 Roll out the PVC floor
Lay the PVC floor evenly on the base layer according to the site plan, leaving a 2-3mm allowance between rolls for splicing, covering the entire construction area. Let it rest for 1-2 hours before and after laying to eliminate stress caused by rolling and ensure the floor is completely flat, without curling or warping.
2.3 Align the Flooring
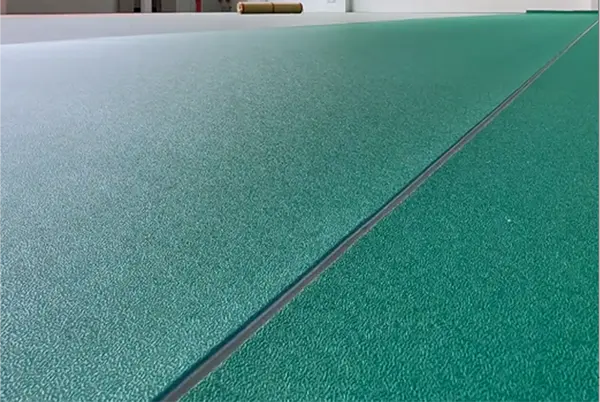
Adjust the position of the rolls, ensuring the joints are perfectly aligned. Leave a 5-8mm expansion joint around the perimeter of the site to accommodate thermal expansion and contraction due to temperature and humidity changes. The gap at the joints should be ≤0.2mm, and the height difference between two rolls should be ≤0.1mm.
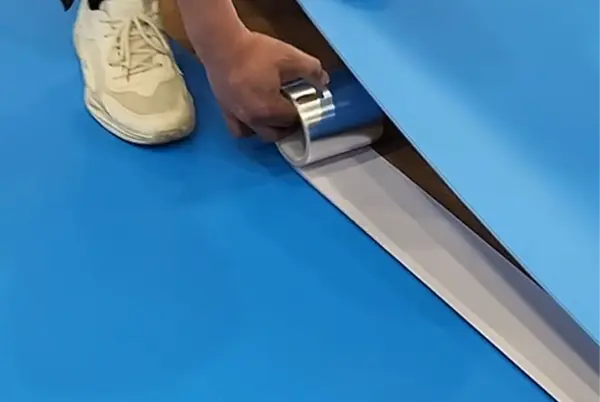
2.4 Glue
Secure the aligned seams of each roll of sports flooring with adhesive tape. This provides temporary fixation for the next step.
If applying adhesive to the entire sheet, fold the roll in half, apply the special PVC adhesive evenly to the base layer, and let it dry to the touch. Then, slowly lay the roll flat and tap it from the center outwards with a rubber mallet to release air bubbles, ensuring a tight bond.
2.5 Grooving
Use a dedicated automatic grooving machine to groove the joint between the two rolls. The groove must be in the exact center of the seam. Automatic grooving machines ensure precise grooving position and effect; manual grooving tools are also an option.
The grooving depth should be 2/3 of the total flooring thickness. Cutting through the fiberglass stabilizing layer is strictly prohibited, as this will compromise the dimensional stability of the flooring and lead to future deformation.
The grooving width should be uniform, and the groove should be free of dust and debris to ensure the welding rod can be fully embedded.
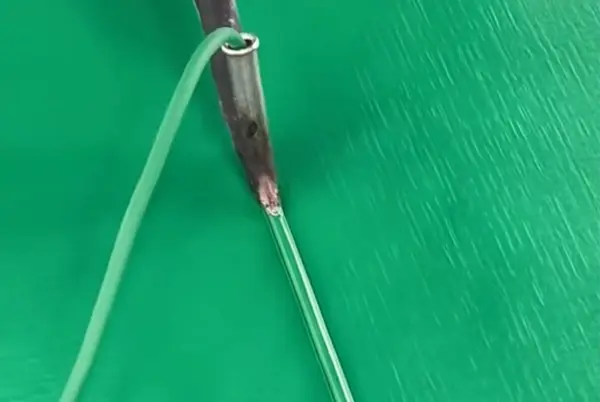
2.6 Welding
Using a precisely temperature-controlled hot air welding gun, melt and embed PVC welding rods of the same material into the groove. Weld at a uniform speed to ensure complete fusion between the welding rod and the groove wall.
The welding temperature must be strictly controlled between 180℃ and 200℃. Excessive temperature will burn through the flooring, while insufficient temperature will result in a weak or incomplete weld.
The weld must be full, without cracks, bubbles, or incomplete welds, and its strength must be greater than or equal to the strength of the flooring substrate.
2.7 Trimming
Using a specialized trimming tool, trim the weld in two stages: First, while the welding rod is semi-cooled, remove most of the protrusions; second, after the welding rod has completely cooled, trim the weld until it is completely flush with the flooring surface.
Over-trimming in one go is strictly prohibited to avoid thinning the wear layer of the flooring, leading to premature wear in certain areas. After trimming, the weld should have no unevenness, no burrs, and should be seamlessly integrated with the flooring surface.
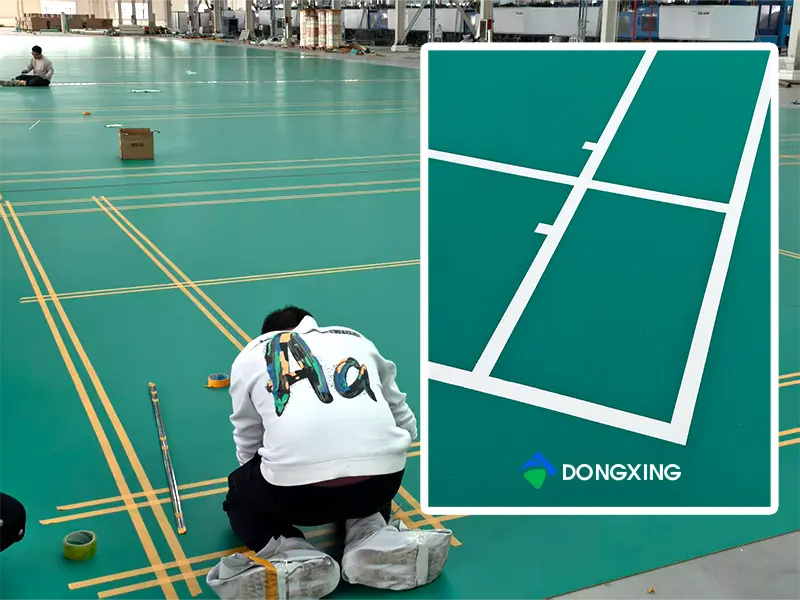
2.8 Drawing the Court Lines
This step is provided by our Dongxing Plastic manufacturer. you do not need to draw the lines yourself. The marking standards should meet the line width requirements of the corresponding court or have customized requirements, ensuring uniform color and neat, burr-free lines.
We will lay out the pre-produced rolls of material, such as four rolls per court (Badminton court mat), in the workshop, then apply masking tape and mark the lines.
After all markings are completed and dried, we will roll them up, pack them, and ship them.
3. Sports Flooring Installation Acceptance
Measured with a 3m straightedge, the overall height error should be ≤2mm, with no bulging, warping, dents, or hollow areas; welds should be free of cracks, bubbles, and incomplete welds, and flush with the surface after repair; tapping the floor should produce no hollow sounds, and there should be no peeling or warping at the edges; the adhesive should not shift after curing; lines should be neat, without burrs or paint peeling; expansion joints should be properly reserved, without compression deformation or arching; the surface should be free of scratches, contamination, burns, color differences, and intact texture;
4. Precautions
We have only provided detailed instructions for PVC flooring installation. Before this, the subfloor should be properly inspected and treated. If the standards are not met, even the best quality materials will have problems.
From our factory to the user, it takes a considerable amount of time (1-2 weeks). During this time, rolled PVC material will develop internal stress and must not be laid directly without allowing it to settle.
When using general-purpose adhesive for installation, the waterproofness, weather resistance, and bonding strength of household all-purpose adhesive are completely insufficient for sports flooring requirements. Specific adhesives must be used.
PVC flooring expands and contracts with temperature changes. For courts longer than 20 meters, such as larger volleyball courts and indoor futsal courts, a 5-8mm expansion joint must be provided every 20 meters.
If this illustrated guide doesn’t help you understand the installation steps, please watch our YouTube video( https://www.youtube.com/shorts/MyBHk19I_YU ) or contact us for a detailed tutorial.
5. In conclusion
In the after-sales issues we have received in the past, installation-related problems are not uncommon. In most cases, verification is required to distinguish between a quality issue with the sports flooring material and improper installation by the user. This undoubtedly incurs costs. Therefore, we hereby declare the relevant installation specifications and recommend that sports court operators and users choose professional installation teams to avoid additional costs. Information on how to inspect the quality of PVC sports flooring can be found in our quality control section and under our product section.